


Back and biceps go together like peanut butter and jelly. Most pulling movements stimulate your biceps as a secondary muscle, which is why back and biceps are commonly included in the same muscle split. But what exercises should you perform to get the most out of this combo? In this article, we’ll explore why the back and biceps split works so well, what muscles you’re targeting, and how to train them efficiently for strength and hypertrophy.
Why Back and Biceps Are Trained Together
Even isolation movements tend to recruit secondary muscle groups. When training your back, you’re also activating the biceps—especially during compound pulling movements. For example, a seated row primarily targets the lats, rhomboids, and traps, but the biceps act as a secondary mover. This co-activation allows you to train both muscles efficiently, increase volume, and experience a better pump.
This muscle split also makes workouts shorter and more effective. Because the biceps are already partially fatigued from compound movements, they don’t require extensive warm-ups before moving into curls or isolation exercises like preacher curls or concentration curls.
Chest and Triceps Follow a Similar Principle
The same concept applies to training chest and triceps in a push-focused workout. During pressing movements like the bench press or incline dumbbell press, the triceps support the chest through elbow extension. These complementary muscle actions are the foundation of popular training structures like push-pull-legs (PPL) and upper-lower splits, which promote better recovery and efficient programming.
For reference, here’s more on optimizing both muscle groups:
Scientific Insight on Muscle Splits
A study by Ribeiro-Alvares et al. (2020) published in the Journal of Strength and Conditioning Research found that training agonist-antagonist muscle groups together—such as chest and back or quads and hamstrings—can improve neuromuscular activation and overall performance. While the biceps and back aren’t antagonistic, their shared function in pulling movements makes them ideal for this type of efficient, synergistic split.
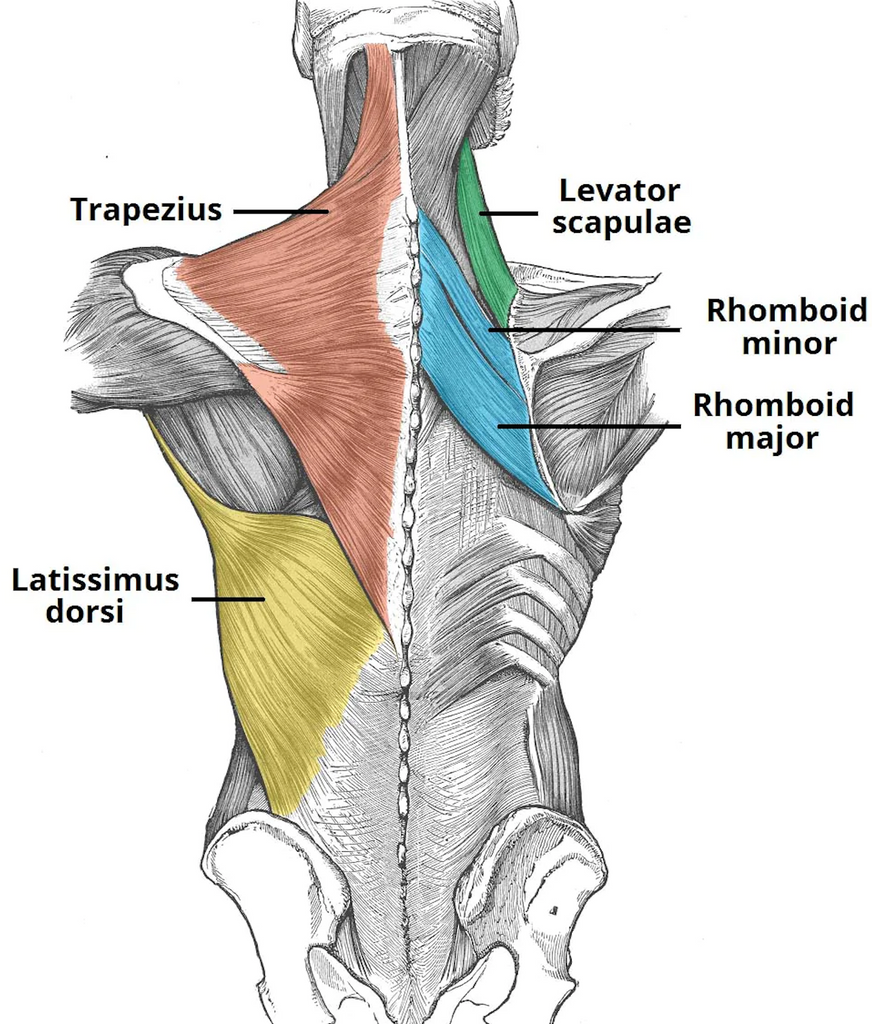
Back Muscles Trained During This Split
The muscles of the back fall into three categories: superficial, intermediate, and deep (intrinsic) muscles. Here are the primary muscles targeted in a back and biceps workout:
Trapezius (Traps)
A large triangular muscle that spans the upper back and neck, the traps assist in scapular elevation, depression, and retraction. They're heavily engaged during shrugs, rows, and deadlifts.
Source: Gray’s Anatomy, Standring
Latissimus Dorsi (Lats)
The lats are fan-shaped muscles that contribute to a strong, V-tapered back. Exercises like pulldowns, pull-ups, and bent-over rows heavily activate this region.
Source: Lehmkuhl et al., JSCR
Levator Scapulae
This muscle runs from the upper cervical spine to the scapula and is involved in scapular elevation and neck movement. It's a secondary stabilizer during pulling motions.
Source: Moore et al., Clinically Oriented Anatomy
Rhomboids (Major and Minor)
These deep muscles retract and stabilize the scapula during rows and pulldowns. They are key to maintaining posture and developing upper-back thickness.
Source: Bogduk, Clinical Anatomy of the Spine
Training back and biceps in the same workout isn't just convenient — it's biomechanically efficient. This muscle split allows you to maximize pulling volume, reduce redundant warm-up time, and take advantage of natural muscle synergy to build strength, size, and endurance more effectively. By understanding the anatomy and function of each muscle involved, you can better structure your workouts for results you can see and feel.
Arm Muscles Trained in This Split
Understanding the secondary muscles trained during pulling exercises helps improve mind-muscle connection, leading to better activation and hypertrophy.
Biceps Brachii
This two-headed muscle on the front of the upper arm assists in elbow flexion, forearm supination, and shoulder flexion. It’s the primary target of most curl variations.
Source: Moritani & deVries, European Journal of Applied Physiology
Brachialis
Located beneath the biceps, the brachialis is a powerful elbow flexor and contributes to arm thickness and strength. It’s best targeted with reverse and hammer curls.
Source: Roy et al., Journal of Applied Physiology
Brachioradialis
This forearm muscle assists in elbow flexion, especially during neutral-grip movements like hammer curls. It also plays a role in forearm rotation and grip strength.
Source: Naito et al., Clinical Anatomy
Triceps Brachii
While primarily trained during push workouts, the triceps are worth noting here. They assist in elbow and shoulder extension and are key for balanced arm development.
Source: Escamilla et al., Journal of Strength and Conditioning Research

6 Best Back Exercises For A Bigger Wider Back
A well-developed back is built through smart programming, strategic overload, and consistent execution of compound pulling movements. These six exercises will help you build size, strength, and definition in your lats, traps, and rhomboids, while also engaging your biceps, forearms, and core. If your goal is a wider, thicker back, these are the lifts that deliver.
1. Single-Arm Dumbbell Row
The single-arm dumbbell row is a unilateral isotonic exercise, meaning it trains one side of the body at a time using constant tension through a full range of motion. This exercise helps correct muscle imbalances, improves core stabilization, and allows for greater mind-muscle connection with your latissimus dorsi (lats)—one of the largest muscles in your back.
Traditionally performed with one knee on a flat bench, you can also execute this movement with a staggered stance, supporting your non-working arm on your leg. The bench variation offers more spinal stability, letting you row with heavier loads and better form.
Single-Arm Dumbbell Row: Build a Stronger, More Balanced Back
The single-arm dumbbell row is a foundational unilateral pulling exercise that targets the latissimus dorsi, rhomboids, and trapezius, while also enhancing core stability and grip strength. Whether your goal is hypertrophy, strength, or fixing muscular imbalances, this row variation belongs in your training split.
How To Perform the Single-Arm Dumbbell Row
Equipment Needed:
-
Flat bench
-
One dumbbell
Step-by-Step Instructions:
-
Setup:
Place your left knee and left hand on a flat bench. Keep your spine neutral and your right foot flat on the ground. Hold a dumbbell in your right hand, letting it hang straight down toward the floor. -
Brace Your Core:
Maintain a flat back and tight core. Keep your shoulders square and avoid rotation through your torso. -
Row the Weight:
Drive your right elbow up and back, keeping it close to your body. Aim to bring the dumbbell toward your hip, not your shoulder, to maximize lat engagement. -
Squeeze and Control:
Pause at the top, squeeze your shoulder blade toward your spine, then slowly lower the dumbbell back to the starting position. -
Repeat:
Perform 8–12 reps, then switch sides. Complete 3–4 total sets per arm.
Muscles Worked
-
Latissimus dorsi
-
Rhomboids
-
Trapezius
-
Posterior deltoids
-
Biceps brachii
-
Erector spinae
-
Core stabilizers (anti-rotation)
Benefits of the Single-Arm Dumbbell Row
1. Strengthens the Lats & Upper Back
This movement is highly effective at recruiting the lats, which are essential for posture, pulling strength, and shoulder function.
“Dumbbell rows produce significant activation in the latissimus dorsi and upper back, making them an efficient single-joint movement for hypertrophy.”
— Andersen et al., Journal of Strength and Conditioning Research
2. Improves Unilateral Strength and Symmetry
Training one side at a time helps identify and correct imbalances in strength, control, and range of motion between your left and right sides.
“Unilateral resistance exercises improve symmetry, reduce compensatory movement, and enhance neuromuscular coordination.”
— McCurdy et al., Journal of Strength and Conditioning Research
3. Enhances Core Stability
Because you’re resisting rotation throughout the lift, this movement forces your obliques and core stabilizers to engage and control the torso.
“Unilateral loading increases trunk muscle activation and stability demands, improving core control.”
— Behm et al., Journal of Strength and Conditioning Research
4. Supports Other Lifts and Movements
Improved upper back strength and scapular control from rows carries over into:
-
Deadlifts
-
Pull-ups
-
Bench press
-
Postural endurance
The single-arm dumbbell row is one of the most effective exercises for building a strong, balanced, and functional back. It develops pulling strength, enhances posture, and reinforces core stability — all while addressing muscular imbalances that bilateral lifts may overlook.
To maximize your progress, support your training with Swolverine Kre-Alkalyn Creatine for strength, and recover faster with Swolverine POST.
Want a full upper-body program tailored to your goals? Get personalized coaching at The Swole Kitchen and let us help you build a stronger, more defined physique — one rep at a time.
2. Lat Pulldown
How to Do the Lat Pulldown: Build a Strong, Defined Back and Improve Pulling Strength
The lat pulldown is a staple upper-body pulling movement that targets the latissimus dorsi (lats) and helps build a wider, stronger back. Often used as a foundational movement in strength and hypertrophy programs, it mimics the mechanics of a pull-up — making it an effective regression for those working toward their first bodyweight pull-up or looking to improve vertical pulling strength.
Whether you’re training for size, strength, or function, the lat pulldown is a must-have in your upper-body routine.
How to Perform the Lat Pulldown
Equipment Needed:
-
Lat pulldown machine
-
Wide-grip straight bar or attachments like a neutral-grip bar or MAG bar
Step-by-Step Instructions
-
Adjust the Machine
-
Sit down and adjust the thigh pad so it fits snugly over your legs to prevent your body from lifting during the pull.
-
-
Grip the Bar
-
Reach up and grab the bar with a wide, overhand grip (pronated) — typically just outside shoulder width.
-
Sit down with arms extended overhead and lean back slightly (~10–15°), keeping your chest proud and core tight.
-
-
Initiate the Pull
-
Drive your elbows down and back, pulling the bar toward your upper chest (just below your chin).
-
Focus on contracting your lats, not pulling with your biceps.
-
-
Squeeze at the Bottom
-
Briefly pause and squeeze your shoulder blades together (scapular retraction) at the bottom of the movement.
-
-
Control the Eccentric
-
Slowly allow the bar to return to the start position under control, maintaining tension in your lats throughout.
-
-
Repeat
-
Perform for the desired number of reps while maintaining form and control.
-
Muscles Worked
-
Primary: Latissimus dorsi (lats)
-
Secondary: Rhomboids, trapezius, teres major, rear deltoids, biceps brachii, brachialis, brachioradialis
-
Core: Stabilization through the abdominals and spinal erectors
Benefits of the Lat Pulldown
1. Builds Back Width and Definition
Lat pulldowns specifically target the lats, the large “V-shaped” muscles that give the back its width and taper. This makes it a go-to for physique development and hypertrophy goals.
“Vertical pulling movements like the lat pulldown preferentially activate the latissimus dorsi, making them ideal for back muscle hypertrophy.”
— Signorile et al., Journal of Strength and Conditioning Research
2. Improves Pull-Up Performance
The lat pulldown mimics the mechanics of the pull-up, making it a great accessory for athletes building toward strict or weighted pull-ups.
3. Supports Postural Strength
Training the lats and upper back improves posture, enhances scapular control, and counteracts forward shoulder rounding from daily habits or push-dominant training.
4. Beginner-Friendly and Adjustable
Unlike pull-ups, the lat pulldown allows for load manipulation and can accommodate any strength level — making it accessible for beginners or those rehabbing injuries.
Programming Tips
For Muscle Growth (Hypertrophy)
-
3–4 sets of 8–12 reps
-
Moderate to heavy weight
-
Focus on slow, controlled movement and full range of motion
For Strength
-
4–5 sets of 6–8 reps
-
Heavier weight with controlled tempo
-
Emphasize explosive concentric and controlled eccentric
For Pull-Up Progressions
-
Superset with banded pull-ups or eccentric pull-ups
-
3 sets of 10–12 reps, 2–3x per week
Common Lat Pulldown Mistakes
-
Pulling the bar behind the neck
→ Increases injury risk and adds stress to the shoulders. Pull to the chest. -
Using momentum or swinging
→ Lean back slightly, but don’t use excessive body motion. Focus on controlled reps. -
Over-gripping with the biceps
→ Engage the lats by driving elbows down, not curling the bar with your arms. -
Letting shoulders shrug at the top
→ Keep your shoulders depressed and scapulae engaged throughout.
The lat pulldown is one of the most effective vertical pulling movements to build a strong, aesthetic back, develop pull-up strength, and improve upper-body posture. It’s accessible, scalable, and adaptable to almost every training program — whether you’re chasing muscle, performance, or posture.
Ready to build a strong, defined back and support recovery?
Recover with Swolverine Whey Protein Isolate
Improve muscle endurance with Swolverine BCAAs + Electrolytes
Optimize your nutrition with The Swole Kitchen Coaching
3. Close Grip Lat Pulldown
How to Do the Close/Narrow-Grip Lat Pulldown: Build Stronger Lats and a Thicker Back
The narrow-grip lat pulldown is a variation of the classic pulldown that emphasizes lat thickness, mid-back development, and greater range of motion. Unlike the wide-grip version, which primarily targets width, the narrow-grip variation allows for a more natural arm path, deeper contraction, and stronger activation of the lower lats, rhomboids, and biceps.
Whether you’re building a stronger pull-up, thickening your back, or improving posture and pulling mechanics, the narrow-grip pulldown is a smart addition to your upper-body training split.
How to Perform the Narrow-Grip Lat Pulldown
Equipment Needed:
-
Lat pulldown machine
-
Narrow-grip attachment (V-bar, close neutral-grip handle, or straight bar with closer grip spacing)
Step-by-Step Instructions
-
Set Up the Machine
-
Adjust the thigh pads to fit snugly over your legs.
-
Select your desired weight on the stack.
-
Attach a narrow-grip handle (V-bar or close-grip triangle).
-
-
Grip the Handle
-
Sit down and grab the handles with a neutral grip (palms facing each other), or a close overhand grip if using a straight bar.
-
-
Position Your Body
-
Sit tall with a slight lean back (10–15°).
-
Keep your chest lifted, core engaged, and shoulders pulled down and back.
-
-
Initiate the Pull
-
Drive your elbows straight down and back, keeping them tucked close to your torso.
-
Pull the handle to your upper chest or sternum, squeezing your lats and mid-back at the bottom.
-
-
Controlled Return
-
Slowly allow the weight to return to the starting position with full stretch at the top while maintaining shoulder tension.
-
-
Repeat
-
Perform each rep with controlled tempo and full range of motion.
-
Muscles Worked
-
Primary: Latissimus dorsi (especially lower lats)
-
Secondary: Rhomboids, trapezius, teres major, rear delts
-
Assisting: Biceps, brachialis, brachioradialis, forearms
-
Stabilizers: Core, spinal erectors
Benefits of the Narrow-Grip Lat Pulldown
1. Emphasizes Lat Thickness
Compared to wide-grip variations, the narrow-grip lat pulldown increases elbow flexion and range of motion, which emphasizes lower lat and mid-back recruitment — helping to build density and depth in your back.
“Closer grip positions elicit greater range of motion and increase biceps and mid-back muscle activation.”
— Signorile et al., Journal of Strength and Conditioning Research
2. Better Range of Motion
The close grip allows for a longer vertical pull, creating more tension through the lats and improving mind-muscle connection.
3. Elbow-Friendly Alternative
The neutral or narrow overhand grip puts less stress on the shoulder joints, making it a safer option for those with shoulder mobility limitations.
4. Carryover to Pull-Ups and Rows
The narrow-grip lat pulldown develops the same movement pattern as neutral-grip pull-ups, which improves pulling strength and rowing mechanics for other compound lifts.
Programming Tips
For Hypertrophy
-
3–4 sets of 10–12 reps
-
Slow eccentric (3 seconds down)
-
Squeeze at the bottom of each rep for 1–2 seconds
For Strength & Progression
-
4–5 sets of 6–8 reps
-
Use heavier loads with controlled form
-
Pair with wide-grip pulldowns or barbell rows
In a Superset:
-
Narrow-Grip Lat Pulldown x 10–12
-
Seated Cable Row x 12–15
-
Repeat for 3–4 rounds for a full back burnout
Common Mistakes to Avoid
-
Pulling the bar behind the neck
→ Always pull to the front of the chest to avoid shoulder impingement. -
Leaning too far back
→ A slight lean is fine, but avoid turning the movement into a row. -
Letting shoulders shrug up at the top
→ Maintain scapular control to keep the tension on the lats. -
Using momentum or jerking the weight
→ Focus on smooth, deliberate reps to maximize muscle engagement.
The narrow-grip lat pulldown is an excellent movement for building a thicker, stronger back while improving pulling strength, shoulder stability, and functional control. It offers better range of motion and joint alignment than wider variations, making it a staple in beginner and advanced programs alike.
Fuel your back-day gains and recovery with:
Swolverine Whey Protein Isolate for lean muscle repair
Swolverine Creatine Monohydrate to support strength and power output
The Swole Kitchen Coaching for customized back-day training and macro coaching
4. Wide Grip Seated Row
How to Do the Wide-Grip Seated Row: Build a Stronger, Wider Back with Proper Form
The wide-grip seated row is a variation of the traditional cable row that emphasizes the upper back, particularly the rear delts, trapezius, and rhomboids, while still hitting the lats and arms. By using a wider grip and horizontal pulling motion, this movement builds back thickness and width, improves postural strength, and enhances overall upper-body development.
Whether you're working to improve your rowing mechanics, strengthen your scapular retractors, or add mass to your back, the wide-grip seated row is a highly effective tool in your training arsenal.
How to Perform the Wide-Grip Seated Cable Row
Equipment Needed:
-
Seated cable row machine
-
Straight or wide-grip row attachment (angled or parallel grip)
Step-by-Step Instructions
-
Set Up the Machine
-
Sit on the bench or platform with your feet firmly planted on the foot pads and your knees slightly bent.
-
Grab the wide-grip handle with a pronated (overhand) grip, wider than shoulder width.
-
Sit tall and slide your hips back until your arms are fully extended and the weight stack is lifted slightly off the rest.
-
-
Engage Your Core and Set Your Posture
-
Keep your chest lifted, shoulders down and back, and spine in a neutral position.
-
Avoid rounding or excessively arching your lower back.
-
-
Initiate the Pull
-
Pull the handle toward your upper abdomen or lower chest, driving your elbows out and back at roughly 45 degrees from your torso.
-
Squeeze your shoulder blades together (scapular retraction) at the peak contraction.
-
-
Control the Return
-
Slowly extend your arms to return to the starting position, maintaining tension in your lats and upper back.
-
-
Repeat
-
Perform controlled reps while maintaining proper posture throughout the movement.
-
Muscles Worked
-
Primary: Trapezius (mid/lower), rhomboids, posterior deltoids
-
Secondary: Latissimus dorsi, teres major, biceps brachii, brachialis
-
Stabilizers: Core, spinal erectors
Benefits of the Wide-Grip Seated Row
1. Targets Upper Back for Width and Thickness
The wide grip changes the angle of pull, placing more emphasis on the rhomboids, traps, and rear delts, which are essential for postural integrity and upper back development.
“Horizontal pulling exercises like the seated row are essential for balancing pressing strength and improving scapular function.”
— Schoenfeld et al., Journal of Strength and Conditioning Research
2. Improves Shoulder Stability and Posture
Wide rows strengthen the muscles responsible for scapular retraction, which supports healthier shoulders, improved mobility, and better alignment during pressing movements.
3. Reduces Imbalances from Push-Dominant Training
Rowing movements help correct overdevelopment from chest and anterior deltoid-focused training by balancing strength across the front and back of the body.
4. Supports Pull-Up and Deadlift Strength
By reinforcing the mid and upper back, the wide-grip row improves pulling mechanics for movements like pull-ups, chin-ups, and deadlifts.
Programming Tips
For Hypertrophy (Muscle Growth)
-
3–4 sets of 10–12 reps
-
Controlled eccentric (2–3 seconds)
-
1–2 second squeeze at peak contraction
For Strength
-
4–5 sets of 6–8 reps
-
Heavier loads, maintain strict form
-
Pair with heavy deadlifts or pull-ups
In a Superset
-
Wide-Grip Seated Row x 12
-
Lat Pulldown x 10
-
Face Pulls x 15
-
Rest 60 seconds, repeat for 3–4 rounds
Common Mistakes to Avoid
-
Shrugging the shoulders
→ Keep shoulders depressed and scapulae retracted to isolate the back. -
Overextending the torso
→ Avoid leaning too far back; maintain slight torso lean with core tight. -
Rounding the lower back
→ Sit tall and keep the spine neutral throughout the set. -
Pulling with the arms
→ Initiate each rep by engaging your shoulder blades, not just your biceps.
The wide-grip seated cable row is a powerful upper-back builder that enhances posture, pulling strength, and muscular balance. By targeting muscles often neglected in push-heavy routines, it supports a strong, stable shoulder girdle and a well-developed back.
Support your back gains and performance with:
Swolverine POST for muscle repair and hydration
Swolverine Creatine Monohydrate to build pulling strength
The Swole Kitchen Nutrition Coaching for personalized training and macro planning
5. Dumbbell Pendlay Row
How to Do the Dumbbell Pendlay Row: Explosive Power for a Thicker, Stronger Back
The Dumbbell Pendlay Row is a variation of the traditional bent-over row that emphasizes explosive pulling from a dead stop on each rep. Unlike standard rows where the weight stays suspended, the Pendlay Row starts from the floor, forcing you to generate force from a static position — improving strength, control, and power in your lats, traps, rhomboids, and posterior chain.
Using dumbbells increases the range of motion, encourages unilateral development, and adds a core stability demand — making this version incredibly effective for improving symmetry, control, and muscle recruitment.
How to Perform the Dumbbell Pendlay Row
Equipment Needed:
-
Two dumbbells (moderate to heavy)
-
Flat, open floor or platform
Step-by-Step Instructions
-
Set Your Stance
-
Place two dumbbells on the floor, spaced shoulder-width apart.
-
Stand with your feet hip-width apart and dumbbells beneath your shoulders.
-
-
Hinge Into Position
-
Bend your knees slightly and hinge at the hips to bring your torso parallel to the ground.
-
Keep your back flat, chest facing down, and core engaged.
-
-
Grip and Brace
-
Grab both dumbbells with a neutral grip (palms facing in).
-
Set your shoulders by retracting and depressing your scapulae.
-
-
Explosive Pull
-
Row the dumbbells explosively off the ground, driving your elbows back and up, aiming to bring the weights to your ribs or just below your chest.
-
-
Reset on the Floor
-
Lower the dumbbells under control and fully reset on the ground before initiating the next rep.
-
Re-brace your core and repeat.
-
Muscles Worked
-
Primary: Latissimus dorsi, rhomboids, trapezius, posterior deltoids
-
Secondary: Biceps, forearms, spinal erectors, glutes, hamstrings, core
Benefits of the Dumbbell Pendlay Row
1. Builds Explosive Pulling Power
Starting each rep from the floor eliminates momentum, requiring pure muscular force to lift the weight — improving starting strength and control.
“Pendlay-style rows train power and acceleration from a dead stop, mimicking the first pull in Olympic lifting and improving posterior chain recruitment.”
— Comfort et al., Journal of Strength and Conditioning Research
2. Targets Full Upper Back
This variation places massive demand on the mid and upper back, especially the rhomboids and lower traps — essential for posture, scapular control, and pulling strength.
3. Improves Postural Strength
By keeping your torso parallel to the ground with a flat back, the movement reinforces proper hinging posture and strengthens the spinal stabilizers — making it highly functional for deadlift and clean performance.
4. Enhances Unilateral Control and Symmetry
Using dumbbells forces each side of the body to work independently, helping correct muscular imbalances and encouraging greater core activation than barbell versions.
Programming Tips
For Strength & Power
-
4–5 sets of 4–6 reps
-
Heavier dumbbells, longer rest (90–120 sec)
-
Focus on explosive concentric, controlled eccentric
For Muscle Growth
-
3–4 sets of 8–10 reps
-
Emphasize tempo: fast up, slow down (2–3 sec)
-
Pair with lat pulldowns or wide-grip rows for back hypertrophy
For Conditioning or Functional Work
-
3 rounds:
-
8 Dumbbell Pendlay Rows
-
10 Dumbbell Cleans
-
15 Kettlebell Swings
-
Rest 1 minute between rounds
-
Common Mistakes to Avoid
-
Not resetting on the floor
→ This removes the "dead stop" nature of the lift. Touch-and-go reduces power training benefits. -
Rounding your back
→ Keep your spine flat and core braced to avoid excessive strain on your lower back. -
Yanking with momentum
→ Generate power through controlled acceleration, not swinging. -
Torso too upright
→ This turns the movement into a hybrid row. Keep your torso as parallel to the ground as possible.
The Dumbbell Pendlay Row is an explosive, full-back exercise that improves pulling power, upper-body thickness, and postural strength. It offers unique advantages over standard bent-over rows by forcing strict form, starting strength, and unilateral control — all with minimal equipment.
Want to enhance your pulling strength and recovery?
Build lean mass with Swolverine Whey Protein Isolate
Increase explosive performance with Swolverine Creatine Monohydrate
Level up your back training with The Swole Kitchen Coaching
5 Best Bicep Exercises To Build More Muscle
When it comes to building bigger, more defined biceps, it’s not just about lifting heavy—it’s about selecting the right movements that isolate and contract the muscle through a full range of motion. These five exercises are designed to maximize bicep hypertrophy, improve muscle activation, and help you achieve sleeve-stretching results.
1. Dumbbell Preacher Curl / Concentration Curl
How to Do the Concentration Curl: Build Peak Biceps With Precision and Control
The concentration curl is a classic bicep isolation exercise that targets the long head of the biceps brachii to help build a more prominent biceps peak. It’s performed in a seated position, allowing for strict form, maximum tension, and complete muscle focus — making it one of the most effective dumbbell exercises for biceps hypertrophy and mind-muscle connection.
Whether you’re a bodybuilder aiming for aesthetic symmetry or simply looking to carve out stronger, more defined arms, the concentration curl belongs in your arm day rotation.
How to Perform the Concentration Curl
Equipment Needed:
-
One dumbbell
-
Bench or flat surface to sit on
Step-by-Step Instructions
-
Get Into Position
-
Sit on the edge of a bench with your legs spread slightly apart.
-
Hold a dumbbell in one hand and rest your working arm’s elbow against the inside of your thigh, letting the dumbbell hang down vertically.
-
-
Set Your Non-Working Arm
-
Place your opposite hand on your knee or hip for balance and support.
-
Keep your torso still and slightly forward, not leaning or swinging.
-
-
Curl the Weight
-
Contract your biceps and curl the dumbbell toward your shoulder, keeping your elbow pinned against your leg throughout the movement.
-
Focus on squeezing the bicep at the top of the curl.
-
-
Lower with Control
-
Slowly lower the dumbbell to the starting position, maintaining tension in your biceps.
-
Fully extend the arm before beginning the next rep.
-
-
Switch Arms and Repeat
-
Complete all reps on one arm before switching to the other.
-
Muscles Worked
-
Primary: Biceps brachii (long head emphasized)
-
Secondary: Brachialis, brachioradialis, forearms (minor involvement)
Benefits of the Concentration Curl
1. Targets the Biceps Peak
By placing the arm in a fixed position and focusing on a full range of motion, concentration curls emphasize the long head of the biceps, which contributes to a taller and more pronounced biceps peak.
“Exercises that isolate the long head of the biceps — such as concentration curls — are effective for increasing hypertrophy and biceps peak development.”
— Oliveira et al., Journal of Sports Medicine and Physical Fitness
2. Enhances Mind-Muscle Connection
Because you’re working one arm at a time in a controlled position, it’s easier to focus on the contraction and squeeze of the biceps, helping improve neuromuscular coordination.
3. Reduces Cheating and Momentum
The seated, stabilized position minimizes momentum and forces strict form, making this a great option for beginners or those looking to isolate the biceps without recruiting shoulders or back.
4. Unilateral Strength and Symmetry
Training one arm at a time helps identify and correct muscle imbalances, leading to more symmetrical biceps development.
Programming Tips
For Muscle Growth
-
3–4 sets of 10–12 reps per arm
-
Focus on slow eccentric (2–3 seconds down)
-
Squeeze at the top for 1–2 seconds per rep
As a Finisher
-
2–3 sets to failure after compound lifts (e.g. barbell curls or chin-ups)
-
Try 21s (7 partials at bottom, 7 top, 7 full range) for a burnout set
Tempo Variation
-
3-1-1 tempo (3 sec down, 1 sec pause, 1 sec up) to increase time under tension
Common Mistakes to Avoid
-
Using momentum or swinging the dumbbell
→ Stay seated and control the entire range of motion. -
Moving the elbow or shoulder
→ Keep your elbow locked into your inner thigh for isolation. -
Shortening the range of motion
→ Fully extend the arm at the bottom for a complete stretch and contraction. -
Leaning back or forward excessively
→ Maintain a neutral spine and stable posture for optimal form.
The concentration curl is one of the most effective isolation exercises for building biceps peak, enhancing mind-muscle connection, and developing arm symmetry. It's simple, strict, and incredibly effective — especially when performed with control and intensity.
Want to accelerate your arm gains? Support recovery and performance with:
Swolverine Whey Protein Isolate to fuel lean muscle
Swolverine Creatine Monohydrate for strength and cell volumization
The Swole Kitchen Nutrition Coaching to optimize your macros and growth strategy
2. Incline Dumbbell Curl
How to Do the Incline Dumbbell Curl: Maximize Biceps Growth and Range of Motion
The incline dumbbell curl is a highly effective biceps isolation exercise that places the arms in a lengthened position, creating more muscle tension throughout the movement. Because of the extended arm position behind the torso, this exercise targets the long head of the biceps, helping develop greater muscle mass, peak shape, and fuller contraction.
It’s a favorite among bodybuilders and physique athletes for a reason — if you want to grow bigger, more defined arms, incline curls belong in your rotation.
How to Perform the Incline Dumbbell Curl
Equipment Needed:
-
Adjustable incline bench (set to 45–65°)
-
A pair of dumbbells (light to moderate weight)
Step-by-Step Instructions
-
Set the Bench
-
Adjust the incline bench to between 45° and 65° depending on comfort and mobility.
-
-
Sit and Set Your Position
-
Sit on the bench with your back flat against the pad and a dumbbell in each hand.
-
Allow your arms to hang straight down at your sides, slightly behind your torso.
-
Use a supinated grip (palms facing forward).
-
-
Brace and Curl
-
Keeping your upper arms stationary, curl the dumbbells upward by bending at the elbows.
-
Focus on lifting through the biceps only, not the shoulders.
-
-
Squeeze at the Top
-
Contract your biceps hard at the top of the movement, but avoid letting your elbows drift forward.
-
-
Lower With Control
-
Slowly return the dumbbells to the starting position, fully extending the arms to stretch the biceps.
-
-
Repeat
-
Perform all reps with controlled form and minimal momentum.
-
Muscles Worked
-
Primary: Biceps brachii (long and short heads)
-
Secondary: Brachialis, brachioradialis, forearms
Benefits of the Incline Dumbbell Curl
1. Emphasizes the Long Head of the Biceps
The incline position puts your arms behind your body, which stretches the long head of the biceps — the portion responsible for developing biceps height and peak.
“Lengthened-position exercises, such as incline curls, increase tension in the long head of the biceps, stimulating greater hypertrophy when trained with full range of motion.”
— Wakahara et al., European Journal of Applied Physiology
2. Increases Time Under Tension
Starting from a deep stretch creates continuous tension throughout the range of motion, which contributes to greater muscle fiber recruitment and growth.
3. Improves Biceps Shape and Aesthetics
Incline curls train the biceps at a different angle than standing curls, promoting fuller muscle development, especially in the lower portion of the biceps.
4. Reduces Momentum and Shoulder Involvement
The incline position limits the use of the front delts, forcing your biceps to do the majority of the work, enhancing isolation and minimizing compensation.
Programming Tips
For Muscle Growth
-
3–4 sets of 10–12 reps
-
Use moderate weight with strict form and slow eccentric (2–3 seconds)
For Hypertrophy Supersets
-
Superset with preacher curls, hammer curls, or concentration curls
-
Example:
-
Incline Curls x 10–12
-
Preacher Curls x 12–15
-
Rest 60–90 seconds, repeat 3–4 rounds
-
For Time Under Tension
-
Use a 3-1-1 tempo:
-
3 seconds down, 1 second pause at the bottom, 1 second curl up
-
Great for maximizing stress on the biceps
-
Common Mistakes to Avoid
-
Letting the elbows shift forward
→ Keep your elbows back to maintain tension on the long head. -
Using too much weight
→ Lighten the load and focus on muscle activation and control. -
Swinging or arching the back
→ Keep your back flat and avoid using momentum. -
Partial reps
→ Fully extend and contract your arms for complete range of motion and full fiber recruitment.
The incline dumbbell curl is a top-tier exercise for biceps isolation, especially if your goal is to build peak shape, mass, and definition. It emphasizes the long head of the biceps, improves time under tension, and enhances your mind-muscle connection — all essential elements for building better arms.
Ready to get the most out of your biceps workouts?
Build lean muscle with Swolverine Whey Protein Isolate
Increase strength and cellular hydration with Swolverine Creatine Monohydrate
Get expert macro coaching from The Swole Kitchen to support hypertrophy and recovery
3. Twisting Curl
How to Do the Twisting Dumbbell Curl: Build Balanced Biceps and Forearms With Every Rep
The twisting dumbbell curl, also called the supinating dumbbell curl, is a bicep curl variation that combines a traditional curl with forearm rotation to engage both heads of the biceps — especially the short head — and forearm supinators for a more complete arm-building stimulus.
By rotating your wrist during the curl (from a neutral to supinated position), this exercise recruits more muscle fibers, improves the mind-muscle connection, and builds fuller, more balanced biceps.
How to Perform the Twisting Dumbbell Curl
Equipment Needed:
-
A pair of dumbbells
-
Optional: Mirror for form feedback
Step-by-Step Instructions
-
Start in a Neutral Position
-
Stand upright with a dumbbell in each hand, palms facing your sides (neutral grip).
-
Feet shoulder-width apart, core braced, and arms fully extended.
-
-
Begin the Curl and Twist
-
Start curling the dumbbell by bending the elbow.
-
As you lift, rotate your wrist outward so that your palm is facing up (supinated) by the time the dumbbell reaches shoulder level.
-
-
Squeeze at the Top
-
At the top of the curl, fully supinate and squeeze your biceps for a second.
-
Elbows should remain close to your torso — no swinging or elbow drift.
-
-
Lower with Control and Re-Twist
-
Slowly lower the dumbbell, reversing the twist, bringing your wrist back to neutral as you extend your arm.
-
Repeat for desired reps and alternate if performing unilaterally.
-
Muscles Worked
-
Primary: Biceps brachii (short and long head)
-
Secondary: Brachialis, brachioradialis, forearm flexors, supinator muscle
Benefits of the Twisting Dumbbell Curl
1. Targets Both Heads of the Biceps
The supination movement especially activates the short head, which is responsible for the inner thickness of the bicep. Combining that with full elbow flexion ensures complete biceps activation.
“Supination during biceps curls increases activation of the short head of the biceps brachii and improves hypertrophy across the muscle belly.”
— Oliveira et al., Journal of Sports Medicine and Physical Fitness
2. Improves Forearm Development
Because this curl involves active rotation of the forearm, it trains the supinator muscle, which contributes to forearm size, strength, and wrist stability.
3. Enhances Mind-Muscle Connection
The twisting motion makes it easier to feel the biceps working, which is ideal for isolation and improving contraction quality — especially for beginners or those with trouble activating their arms during curls.
4. Reduces Wrist Strain
Starting in a neutral grip and rotating into supination can feel more natural than starting with a static underhand grip, making this variation easier on the wrists while still recruiting the biceps effectively.
Programming Tips
For Hypertrophy
-
3–4 sets of 10–12 reps
-
Emphasize controlled movement and slow eccentric (3 sec down)
-
Squeeze at the top for a strong peak contraction
Superset Ideas
-
Twisting Curl + Hammer Curl
→ Twist curl for 8–10 reps
→ Immediately follow with 10 hammer curls
→ Rest 60 seconds, repeat for 3–4 rounds
Drop Set Finisher
-
Start with a heavy set of 8–10 reps
-
Drop 5–10 lbs and go for 10–12
-
Drop again and go to failure
Common Mistakes to Avoid
-
Skipping the twist
→ Rotating your wrist is what makes this curl effective — don’t treat it like a regular curl. -
Using momentum
→ No swinging. Keep your torso upright and elbows pinned. -
Not fully supinating
→ Make sure your palm is facing the ceiling at the top of the curl. -
Partial reps
→ Lower all the way and reset each rep with a full stretch.
The twisting dumbbell curl is a simple but highly effective curl variation for building biceps shape, peak, and forearm strength. By incorporating a twist, you stimulate the short head of the biceps more effectively and develop balanced, stronger arms with every rep.
Optimize your arm training and recovery with:
Swolverine Whey Protein Isolate for lean muscle growth
Swolverine BCAAs + Electrolytes to support hydration and endurance
The Swole Kitchen Nutrition Coaching to maximize gains with personalized macros
4. Zottman Curl
How to Do the Zottman Curl: Build Bigger Biceps and Stronger Forearms in One Move
The Zottman Curl is a classic biceps curl variation that combines the benefits of both supinated curls (palms-up) and reverse curls (palms-down) into one fluid, muscle-building movement. Named after 19th-century strongman George Zottman, this exercise is unique in its ability to target the biceps brachii, brachialis, brachioradialis, and forearm extensors in a single, efficient rep.
If your goal is to build stronger, thicker arms — both in size and grip strength — the Zottman Curl is a must-have in your routine.
How to Perform the Zottman Curl
Equipment Needed:
-
A pair of dumbbells
Step-by-Step Instructions
-
Starting Position
-
Stand tall with your feet shoulder-width apart and a dumbbell in each hand.
-
Begin with your palms facing forward (supinated grip), arms fully extended at your sides.
-
-
Supinated Curl Up
-
Keeping your elbows close to your sides, curl the dumbbells up as you would in a standard bicep curl, contracting your biceps as you bring the weights to shoulder level.
-
-
Rotate at the Top
-
At the top of the curl, rotate your wrists outward so your palms are now facing downward (pronated grip).
-
-
Controlled Lower (Reverse Eccentric)
-
Lower the dumbbells back down slowly and under control with your palms facing down, emphasizing the forearms and brachialis during the eccentric portion.
-
-
Rotate Back to Supinated Grip
-
Once your arms are fully extended at the bottom, rotate your wrists back to the palms-up starting position and begin the next rep.
-
Muscles Worked
-
Primary (Concentric): Biceps brachii (short and long heads)
-
Primary (Eccentric): Brachialis, brachioradialis, forearm extensors
-
Secondary: Wrist flexors, core (for stabilization)
Benefits of the Zottman Curl
1. Targets Both Biceps and Forearms
The supinated curl focuses on biceps contraction, while the reverse-lowered phase puts major emphasis on the brachialis and forearms, giving you complete arm development in one move.
“Exercises that incorporate multiple angles of resistance, like the Zottman Curl, effectively increase muscle activation across both elbow flexors and forearm extensors.”
— Aboodarda et al., Journal of Strength and Conditioning Research
2. Builds Grip Strength
The pronated eccentric phase heavily involves the brachioradialis and grip muscles, which can carry over to stronger deadlifts, rows, and pull-ups.
3. Increases Time Under Tension
The deliberate rotation and eccentric control significantly increase time under tension, which is a key factor in hypertrophy and muscle growth.
4. Improves Aesthetic Symmetry
By developing not just the biceps peak but also brachialis width and forearm density, Zottman curls help create the fuller, thicker arm appearance many lifters strive for.
Programming Tips
For Size and Shape
-
3–4 sets of 10–12 reps
-
Control the eccentric phase (3–4 seconds down)
-
Focus on squeezing at the top and full rotation
For Arm Supersets
-
Pair with incline curls or hammer curls for total biceps fatigue
-
Example superset:
-
Zottman Curl x 10
-
Hammer Curl x 12
-
Rest 60–90 sec, repeat 3–4 rounds
-
For Grip and Strength
-
Use slightly heavier dumbbells, keep reps around 6–8
-
Add Zottmans to a forearm-finisher circuit with reverse curls and wrist curls
Common Mistakes to Avoid
-
Skipping the wrist rotation
→ The twist is what makes it a Zottman Curl — don’t rush it. -
Lowering with a supinated grip
→ Always rotate to palms-down before lowering for full forearm engagement. -
Using momentum
→ Perform strict, deliberate reps — no swinging or bouncing. -
Inconsistent elbow position
→ Keep elbows pinned to your sides to isolate the biceps and avoid shoulder involvement.
The Zottman Curl is a timeless biceps-builder that trains the arms through multiple angles, combining biceps peak contraction with forearm strength and size. It’s ideal for lifters who want well-rounded arm development, better grip, and more functional strength.
Support your arm training with:
Swolverine Whey Protein Isolate for muscle recovery and lean growth
Swolverine Creatine Monohydrate to increase power output
The Swole Kitchen Nutrition Coaching for tailored macro strategies and aesthetic results
5. Hammer Curl
How to Do the Hammer Curl: Build Bigger Arms and Forearms With One Powerful Curl
The hammer curl is a dumbbell curl variation that targets not just your biceps, but also your brachialis and brachioradialis — two key muscles responsible for thicker, stronger arms and improved grip strength. By keeping your palms in a neutral grip (facing each other), this exercise reduces strain on the wrists while maximizing arm development and functional strength.
Whether you're chasing arm aesthetics, building grip for deadlifts, or training for all-around strength, the hammer curl delivers big results.
How to Perform the Hammer Curl
Equipment Needed:
-
A pair of dumbbells
-
Optional: Incline bench (for seated variation)
Step-by-Step Instructions
-
Set Your Position
-
Stand tall with your feet shoulder-width apart.
-
Hold a dumbbell in each hand with your palms facing in toward your torso (neutral grip).
-
-
Brace and Curl
-
Keep your elbows close to your sides.
-
Curl the dumbbells upward by bending your elbows, lifting until the dumbbells reach shoulder height.
-
Maintain a neutral grip throughout the movement — do not twist or supinate the wrists.
-
-
Squeeze at the Top
-
At the top of the curl, contract your biceps and forearms, pausing briefly for peak tension.
-
-
Lower With Control
-
Slowly lower the dumbbells back to the starting position, fully extending your arms at the bottom.
-
-
Repeat
-
Perform all reps with strict form, avoiding momentum or swinging.
-
Muscles Worked
-
Primary: Biceps brachii (both heads), brachialis
-
Secondary: Brachioradialis, forearm flexors, wrist stabilizers
Benefits of the Hammer Curl
1. Builds Thicker, Stronger Arms
The brachialis, located underneath the biceps, is heavily targeted during hammer curls. As it grows, it pushes the biceps up, helping create the illusion of wider, fuller arms.
“The neutral grip of the hammer curl favors activation of the brachialis and brachioradialis, contributing to overall arm size and strength.”
— Oliveira et al., Journal of Sports Medicine and Physical Fitness
2. Improves Grip and Forearm Strength
Because hammer curls emphasize the brachioradialis and forearm flexors, they support better grip strength for exercises like deadlifts, pull-ups, rows, and strongman carries.
3. Joint-Friendly Curl Option
The neutral wrist position reduces rotational strain on the elbows and wrists, making this curl variation an ideal choice for lifters with joint discomfort or previous injuries.
4. Versatile for Hypertrophy or Strength
Hammer curls can be programmed for isolation, volume, or grip-specific work — making them a valuable tool in any training split.
Programming Tips
For Size and Shape
-
3–4 sets of 10–12 reps
-
Focus on strict form and slow eccentric control
For Grip and Strength
-
3–5 sets of 6–8 reps
-
Heavier dumbbells, but avoid using momentum
-
Use in supersets with chin-ups or rows
As a Finisher
-
Drop Set:
-
10 reps heavy → drop weight → 10 reps moderate → drop → 10 reps light
-
Great for pump and time under tension
-
Common Mistakes to Avoid
-
Using momentum or swinging
→ Keep your upper arms locked at your sides; isolate the elbow flexion. -
Letting the wrists break
→ Maintain straight wrists throughout the movement for consistent tension. -
Turning the palms up (supination)
→ That turns it into a regular curl. Keep your palms neutral the entire time. -
Not controlling the eccentric
→ Resist gravity and lower with intent to maximize muscle recruitment.
The hammer curl is a powerful, joint-friendly exercise that helps you build bigger, stronger, more complete arms. By targeting the brachialis and brachioradialis in addition to the biceps, it enhances both your aesthetics and your functional pulling strength.
Optimize your gains and recovery with:
Swolverine Whey Protein Isolate for lean muscle growth
Swolverine Creatine Monohydrate to support strength and volume
The Swole Kitchen Coaching for personalized macros and training support
Need Help With Optimizing Your Diet And Nutrition Plan To Finally Get The Results You've Been Waiting For?

SWOLVERINE IS AN ENDURANCE ATHLETE AND ACTIVE LIFESTYLE BRAND. MADE FOR THE ELITE ATHLETE, AND THE STRONG-WILLED OUR PRODUCTS WERE DESIGNED TO FUEL YOUR ATHLETIC PERFORMANCE. WE PERFORM WHEN YOU PERFORM.
We believe that everyone can optimize not only their athletic performance but their human potential. The way we believe we can optimize performance is through transparency, clinically effective doses, and clinically proven ingredients with evidence-based outcomes. We provide the nutrients you need to power your active lifestyle.


