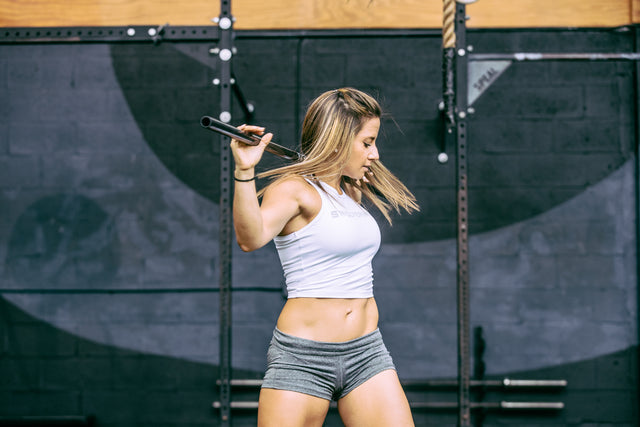


Do you get flattened by your overhead squat? Does your soul get a little crushed when you see them in the WOD? Do your shoulders shrivel up into your neck, cringing at the thought of doing them? Then this article is for you!
There’s one simple reason why you should care about overhead squats if you do CrossFit, and the reason is this: snatches are going away any time soon. Snatches pop up in workouts and training all the time, and one of the biggest ways to progress your snatch into higher weight ranges is by mastering and practicing the overhead squat. Unfortunately, as amazing as the OHS squat can be, it can also be a miserable, difficult, painful and frustrating, elusive movement for many athletes, especially those early in their athletic journey. This is exactly why we’ve put together these 9 tips to master your overhead squat.
Overhead Squat Tip #1: Stretch Yourself Before You Wreck Yourself
Yeah, we get it. Stretching feels like a waste of time. You go to the gym to smash weights and get dates, not roll around on a blue mat like a dead bug painfully positioning yourself on a funky looking foam roller in your groin. Well, it’s time to change the paradigm.
While it’s not the case for everyone, the majority of athletes have an issue with their overhead squat not due to strength, but flexion and tightness, albeit in the shoulders, chest, lats, hips, and/or hamstrings. If overhead squats are an elusive beast for you, this is a great place to start.
Overhead Squat Tip #2: Use A Bar Or Use A PVC Pipe
If you’re working with a very early beginner or child, a barbell might be too much weight to start. Instead, we recommend starting to practice the Overhead Squat technique and movement with either a PVC or something like a wooden stick or broom.

Overhead Squat Tip #3: Establish The Correct Hand Placement For Your Body
Using a PVC pipe or barbell, stand upright and pull your elbows upwards, making an upside-down goal post with your arms. Your arms should end up in a 90-degree position, making an L shape with each arm. Measure the distance between your hands and that’s your hand position.
Should you take it a few inches out from this placement? It’s up to you – some athletes will do this so that they have the same grip for both the overhead squat and the barbell snatch. Each hand placement is individualized, which is why you see taller individuals with their hands almost out to the collars, while shorter people have their hands closer to the notch of the bar.
Stay focused on your set up on the bar. When gripped and overhead, the barbell should be ~6-8 inches above the top of your head.
Overhead Squat Tip #4: Get A Grip
Whenever you’re holding the bar over your head, you want to make sure that you have the correct hand placement. To find your grip position, standing tall with a barbell or PVC pipe in front of you, spread your hands out along the bar so that it ends up directly under your belly button. If your grip position or hand placement on the bar is too narrow, you’ll fall forward with the bar. Whereas if it’s too wide, you may feel some extreme wrist discomfort, due to the intense pressure placed between the wrist and the thumb.
If you experience pain, discomfort, or instability in the wrists when in an overhead position, your wrist may be too neutral; meaning the back of the hand is in line with the back of the forearm.
There are three main reasons why you do not want a neutral wrist in the overhead squat:
- Neutral wrist positioning doesn’t provide sufficient support because you’re relying on a ligamentous structure for stability, which is an insufficient source of strength.
- Neutral wrist positioning puts the bar into a position that is too far forward with respect to the rest of the arm.
- Neutral wrist positioning is just straight-up painful.
To fix a neutral wrist, take an empty barbell or PVC pipe and practice both your grip and wrist placement. If your knuckles are pointing forward, you’re doing it wrong. Place your palms to the sky and with your strong grip, try to pull the bar apart in order to force your elbows to lock and engage your lats. Lastly, when you find a comfortable position, using the knurling/marks on the bar, remember where your thumb sits so you can set up the same way, every time.
Overhead Squat Tip #5: Knees Out, Not Forward
When the knees go forward outside of the bottom position, you lose your tension. The overhead squat starts with a solid air squat, and much like stretching, it shouldn’t be overlooked. With your pelvis tucked, your core and glutes engaged, imagine yourself screwing your feet into the ground with external rotation. This small cue can create a seriously big squat.
The idea behind screwing your feet into the ground with external rotation is to help you create stability in the hip pocket, generating torque. In order to create a stable pelvis, you need external rotation, keeping the knees from caving inward, creating an active impingement. Your coach might tell you to “screw your feet into the ground” and by this they mean making strong, solid contact with all three points of your foot, enabling the external rotation of the hips.

External rotation happens in two main areas of the body, shoulders, and hips, thanks to the ball and socket joint mechanism. Essentially, you’re creating stability in the hip pocket when you screw the feet into the ground, allowing yourself to generate torque, resulting in a stronger overhead squat. Think of this cue as a way to activate particular muscles by yourself (this is called proprioception). If you were to watch someone do this, you would see the knees and the rest of the legs twist outward. Keep in mind this rotation should be done during the entire movement of the squat - both descending and ascending.
Overhead Squat Tip #6: The Bottom Position Check-List
In the bottom part of the overhead squat, there are a few things you need to keep in mind.
- Are the elbows completely locked out?
- Are the wrists extended?
- Are the eyes locked straight forward in front of the athlete?
- Are the knees in line with the feet?
In this bottom position, the knees should be forward over the toes, allowing for the deepest position while keeping the trunk upright, allowing the bar to be maintained overhead.
Overhead Squat Tip #7: Engage Your Core & Keep Your Booty Out
Bracing your core and your spine through the overhead squat is crucial for not only strength but avoiding injury. Take a big breath in, brace the core, and lift. Maintain a tight core throughout the entire movement while pushing your posterior away from your midline. Successfully doing this will balance your center of gravity, keeping you from tipping either forward or backward.
Overhead Squat Tip #8: Don’t Hold Your Breath
We have an entire article about breathing techniques and lifting. You can check it out below:

Overhead Squat Tip #9: Don’t Lose Your Head
Lastly, have patience and don’t lose your cool. Developing a strong and functional overhead squat takes time and lots of it. Nobody cares how much you lift if you don’t lift with the proper technique because your rate of injury is so much higher. Any coach or teammate wants to see you do your best, of course, but work smarter, not harder. Especially in the beginning.
RELATED ARTICLE How To Foster A Growth Mindset
Overhead Squat: Takeaway
You will have to navigate the cues that work best for you to remember, but with the proper time, execution, and practice, you’ll be overhead squatting like a pro in no time. Get comfortable with being uncomfortable, work up to moderate weights, then work back down. Establish the same hand position on the bar, punch your wrists to the back wall, show your armpits and drive those knees. Lastly, don’t forget to stretch and work on your mobility. This opens up your hips, allows for core stability, max strength, an upright chest and a stable center of gravity. Get mobile, get strong, get focused and good luck!
Need Help With Optimizing Your Diet, Nutrition, And Training Plan To Finally Get The Results You've Been Waiting For?

SWOLVERINE IS AN ENDURANCE ATHLETE AND ACTIVE LIFESTYLE BRAND. MADE FOR THE ELITE ATHLETE, AND THE STRONG-WILLED OUR PRODUCTS WERE DESIGNED TO FUEL YOUR ATHLETIC PERFORMANCE. WE PERFORM WHEN YOU PERFORM.
We believe that everyone can optimize not only their athletic performance but their human potential. The way we believe we can optimize performance is through transparency, clinically effective doses, and clinically proven ingredients with evidence-based outcomes. We provide the nutrients you need to power your active lifestyle.